Popular Post

Popular Posts

Recent post

Showing posts with label Teknologi. Show all posts

How to create chart using only HTML and CSS

NY
Boston
LA
Houston
Washington
It is a very common need to create charts to show in web pages. There are, of course, several tools you can use. I sometimes rather create the chart myself and keep control of every detail and fix eventual bugs.
Let's learn how to create a very simple HTML with a chart with the following steps:
  • create a html file
  • link this file with an external css file
  • create the html code that will contain the chart
  • create the css code that will give the chart its appearance
  • include a css code in the html file to set the size and color of each column
The chart will not include any image nor javascript. To understand this tutorial you do not need to know any programming language. Of course if you do and are willing to use such resources you could make the chart much better. Nevertheless for you to create automated charts you'll benefit from knowing how to build them using HTML/CSS anyway.

Creating an html file

If you have an HTML file this is of course unnecessary (or if you already have a program generating it). If you don't have it, create it using a text editor. You can use Gedit (under Gnome), Kate (under KDE) or Bluefish (under Windows) or, better yet Vim or Emacs if you are willing to use advanced and powerful tools.
Create a new file and type the following:


Chart example with HTML and CSS

The line  makes complex characters to display correctly. The line  create a link between this HTML file and the CSS file that we will create next.

Chart HTML code

Let's build our chart. The html of the chart is made up with divs. A div is usually used to create limit a space in the page, a rectangle, which dimensions and details we will set in our CSS file.
We'll create a div to contain the whole chart. It will be large and have a thin silver border. Inside it we'll create another div that will work as a container to be used if a customization of the chart is needed without changing the borders. The use of containers is quite common and is usually helpful when creating CSS. Now we basically have a box inside another. Our next step will be to create another set of x boxes (in our example x will be 5). HTML is usually rendered from left to right and from top to bottom. Our chart will be a bar chart. The bars grow from bottom up. To obtain this effect we will need to place another box inside each column. To get this done we will need to place another box inside each column. This is because we will need to set to the columns two rules. Each bar should be rendered to the right of the previous and should start from bottom and grow up. A regular box in html starts on top and grow down. Here is the code:

NY
Boston
LA
Houston
Washington
If you are not really used to deal with HTML and CSS note that the elements receive attributes in the form of class="column" or class="fill" or class="x". Classes are great tools to organize our code. HTML do not really set the look of the page. This is done with another language (CSS) that will need to reference the elements it want to theme. We'll largely do this using classes.

Creating the CSS code

CSS stands for Cascading Style Sheet. It is a language used to create the style of a document, that means: it's looks. It is a rather simple language that can be used to achieve very interesting and even complex looks. It is mostly used to theme texts: making paragraphs and titles look nice, but we'll use it here to create a chart.
You should keep in mind HTML is usually used to create texts and therefore it's rules and definitions are specially good to this need. There are some extra difficulties when we use it to other goals. You will, of course, timely learn to overcome them.
Let's edit the chart.css file, that is called by the chart.html file we just edited. Note that the link we established between them sets only the name of the file, not it's path. This means the computer will assume they are at the same folder.
Let's continue:
We'll set for chart div a width of 450 pixels (450px) and a 300px height. Next we will set a silver thin border and, finally we will make it have an inner margin (padding) of 10px, that means 10px between the content and its border.
We will make each column have a width of 80px and a height equal to the height of the box the bar is in, that means: 100%. When we establish that an element has 100% height we are making it occupy the whole space available to it. As the column is inside a chart div, we are saying it will fill the whole available space inside that div. We will also make it have margins of 2px above and bellow and 5px to the left and right. This way columns there will be a space of 10px between each column.
Now we get to the most sensitive part of our tutorial. The HTML elements may be positioned differently depending on what they are. Texts, for instance, are rendered from left to right, occupying all the available space to the right of the previous text, if it fits. Blocks, on the other hand, are positioned one bellow the other, regardless of any available space to the right of the previous. Our columns are blocks and will be positioned one bellow the other unless we do something about it. We need to tell our columns to float to the left, that means, to behave like text would, so they will open some space to their right for other blocks to fill it.
Note: when an element floats it is as if it had opened up some space for others to fill it and not as if it was trying to fill the space left open by others.
Continuing the most important part: we will now make each column have a relative position to it's parent. The parent element is the element inside which the column is, that is the column-container div is the parent of the column div. It is important to establish that the column has a relative position because it is possible to set absolute positions relatively to the parent relative position. Confusing, isn't it? Let me try to fix it ahead, OK?
The result we'd have now would be a big box with a silver border and several columns inside it, going from the base to the top, but they'd be invisible, as we defined no background color or borders. Notice that the columns will all be the same size and will always cover from base to top. For us to fill each column differently we will create another inner element, which we called fill, to receive the filling color. We will make the fill color with a 100% width and each with a different height. The fill element will be positioned absolutely in the base of the column.
We are now back to the question of the absolute positioning. We want the filling of the column (the visible part of the bar) to stay in the bottom of the chart. We want it always to be, regardless of it's size, in the bottom. We will do this by setting to fill an absolute position. When we do this it gains an absolute position relative to the page and this would place all colors of the chart in the same place, and we would only see the last one. That is why we need to give each element an absolute position to a different reference. It happens the absolute position is actually relative to something, usually the page itself. Thus, an element positioned 20px to the top will be 20px to the top of the page. An element with an absolute position that is place inside an element with a relative position, though, is positioned absolutely to its parent. This is why we set column div to have position relative and to float left. Fill div is position absolute and is 0px from base.
Here is the code:

.chart{
 border: solid thin silver;
 width: 450px;
 height: 300px;
 padding: 10px;
}
.column{
 width: 80px;
 height: 100%;
 margin: 2px 5px;
 float: left;
 position: relative;
}

.column .fill{
 width: 100%;
 position: absolute;
 bottom: 0px;
}
.label{
 text-align: center;
}
Now we need so save the file and proceed to the last part of our chart.

Setting the colors and the height of each column of the chart

Let's set the colors and the height of each column using a CSS code embedded in the HTML code. The reason we will use thes HTML embedded instead of simply including it in the chart.css file is this: we usually do not writ HTML code directly in the HTML file, instead we write a script that do this for us - this is called dynamic page. CSS files, on the other hand, are not usually "dynamic" and therefore are not created within scripts. So, elements that may change usually go in the HTML files and elements that will not change are placed in CSS files. In our chart colors and height may change with changes in the data. Although our chart is static (written directly in the file) and not dynamic, we may want to make it dynamic someday.
To include an embedded CSS in the HTML we use the tag style. In it we set the color and the height of each column. Let's see the code:


Note the attribute nth-child allows us to reference a specific child of an element. The first, second and, of course, nth element.
The final result, then will be two files: chart.html and chart.css. Download a zip file with them.

from : http://ndvo.blog.br/

Automating repetitive tasks in the browser

Imagine your boss comes very anxious at work and ask you an unholy task: he has a spreadsheet with 600 lines and he needs you to fill a form on the web for each one of them. He expects you access this form and fill every field some 600 times.
Well, there's a very interesting Firefox plugin called iMacros that will make your task a lot easier. iMacro allows you to record and play Macros. That means you click the REC button, do what you got to do and then click the STOP button. You then save the macro under any name you want and you are a click away from getting Firefox to do it all over again by itself. Neat.
In Firefox, click Tools > Complements and search for iMacros (or use the above link). After installing it will be necessary to restart Firefox. Once restarted you will see an icon before the address bar (there is a green gear in the icon). Click this icon and a side panel will show.
Notice that the panel has three tabs: "Use", "Record", "Edit".
Let's make a test: click "Record". He will ask if you want to close the other tabs (if there are any other opened) and after that it will be recording. Surf the web a little, access Google, make a little search and than press "Stop". All that you have done is recorded, you may click "Save" button to name your Macro. If you don't, it will remain under the name "#Current.iim" and will be override as soon as you record a new macro. If you name your macro you will be able to easily find it in the future if you need.
Now click the "Use" button and you will see your browser working by itself, going through all pages you went before and typing everything you typed.

Filling a form based on a CSV file

Let's do it. We will use a spreadsheet to fill automatically the fields of a web form.

Step 1 - Recording a macro

Access the form your boss asked you to fill. Set iMacro to record and fill every field. Save the macro with a familiar name.

Step 2 - Preparing the csv file

iMacro doesn't work with Excel or LibreOffice. You'll need to open the spreadsheet and save it in CSV format. It will be necessary to remove any merged cells the file may contain.
With LibreOffice, when saving your spreadsheet, you'll be asked what symbol to use as a column separator and what text delimiter to use. Column separator should be the comma , and text delimiter should be double quotes. Save the CSV file with a simple name (no spaces or complex chars).
iMacro uses only files saved at the folder iMacros/Datasources that should be located in your personal folder (in Linux, usually /home/username/iMacros/Datasources)

Step 3 - Editing the macro file

We need to edit the saved Macro, otherwise it will always fill the form with the same values.
Open the folder iMacros/Macros (/home/username/iMacros/Datasources) and look for the file with the name you gave you macro. If you named your macro "testing" it will be named "testing.iim".
Open the file.
In the beginning of the file (after TAB T=1, if it is there) you will need to identify the file that will be used as source of the data we want to upload. Let's set the following variables:
  • !DATASOURCE as the name of the file that contain the data (CSV file);
  • !DATASOURCE_COLUMNS the number of columns the file contains (this number must be accurate);
  • !LOOP the number of the line that contains the first line of data (if your file has 2 lines of header use 3, if your file has no header use 1)
Here is the result for our example:
TAB T=1
SET !DATASOURCE data.csv
SET !DATASOURCE_COLUMNS 3
SET !LOOP 1
SET !DATASOURCE_LINE {{!LOOP}}
Now let's work the macro loop (the rest of the document). Check out the code iMacro generated. You will notice that it refers to the fields you filled and the positions your mouse clicked. Carefully find the which lines in the Macro corresponds to each field of the web form. Identify also the number of the column where the information for each field is saved in the data file.
For each field you will find in the code something similar to "CONTENT = Adam Smith", for instance, to write "Adam Smith" in the form field. Replace the value written in the recorded Macro (the value you typed in the web form) for the column identifier. The column identifier will have the following syntax: {{!COL1}}, where 1 should be replaced by the number of the column that has the data. Thus, for a data located at the first column, use {{!COL1}}. For data at the second column, use {{!COL2}}.
Now let's check our example:
URL GOTO=http:/testing-url.test
TAG POS=1 TYPE=INPUT:TEXT FORM=ACTION:/node/add/pericia ATTR=ID:edit-title CONTENT={{!COL1}}
TAG POS=1 TYPE=INPUT:TEXT FORM=ACTION:/node/add/pericia ATTR=ID:edit-field-tipo-pericia-0-nid-nid CONTENT={{!COL2}}
TAG POS=1 TYPE=INPUT:SUBMIT FORM=ID:node-form ATTR=ID:edit-submit

Step 4 - Running the macro

It's now all set. Now you need to go to your browser and click at the "Use" tab. There you will find the "Use (loop)" button. Notice that above it there is a field "Max". Fill the "max" field with the number of lines you want to fill. That is, if your file has 500 lines and you want to fill up to the line 499, type 499. Now, click the "Use (loop)" button and iMacro will execute it. It will fill the form one time for each line in the data.csv file up to the 499th line.

Step 5 - Learn more

I am not sure if I explained it enough, but I learned it reading the iMacro wiki. You'll get a lot of info there.
Here is the code I've recently used as an example. I've experienced some problems related to the CSV file. It really needs to be saved with commas as column separators and double quotes as text delimiters. I suggest using LibreOffice calc to export CSV or editin CSV directly. Lot's of people had trouble using Excel.


TAB T=1
SET !DATASOURCE lista_dos_produtos_a_carregar.csv
SET !DATASOURCE_COLUMNS 3
SET !LOOP 1
SET !DATASOURCE_LINE {{!LOOP}}  
URL GOTO=http://examplesite.test
TAG POS=1 TYPE=INPUT:TEXT FORM=ACTION:/node/add/pericia ATTR=ID:edit-title CONTENT={{!COL1}}
TAG POS=1 TYPE=INPUT:TEXT FORM=ACTION:/node/add/pericia ATTR=ID:edit-field-tipo-pericia-0-nid-nid CONTENT={{!COL2}}
TAG POS=1 TYPE=INPUT:SUBMIT FORM=ID:node-form ATTR=ID:edit-submitfrom: http://ndvo.blog.br/


Cara Mudah Download Video di LINE for Android


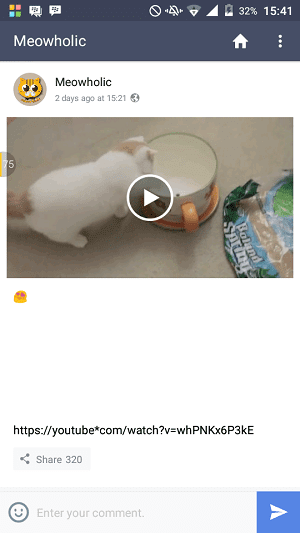
Selain layanan chat, panggilan suara dan video chat, LINEmemiliki fitur Home. Pada fitur ini, pengguna bisa berbagi status berupa teks, foto atau video. Selain untuk mengekspresikan perasaan kamu, LINE Home juga bisa digunakan untuk menghibur diri dengan menikmati apa yang dibagikan oleh teman LINE kamu. Tak jarang, selalu ada video menarik yang dibagikan oleh teman bukan?

Jika ada video yang menarik, pasti tergelitik untuk menyimpan video tersebut. Namun sayangnya LINE tidak menyediakan fitur untuk menyimpan video langsung dari LINE Home. Lantas, bagaimana cara menyimpan video dari LINE Home?

Cara Mudah Download Video di LINE for Android

Jaka akan berikan tutorial agar kamu bisa menyimpan video dari LINE.
Untuk memudahkan prosesnya, kamu terlebih dahulu harus menginstal X-plore File Manager. Atau gunakan aplikasi lain seperti Root Explorer.


X-plore File Manager 3.85.00
Productivity by Top Free Games.
Download Google Play


Di halaman LINE Home, silakan cari video yang menarik. Lalu putar video tersebut hingga selesai. Jangan menyentuh permukaan layar smartphone selama video tersebut diputar, karena akan mengganggu hasil video yang akan disimpan.


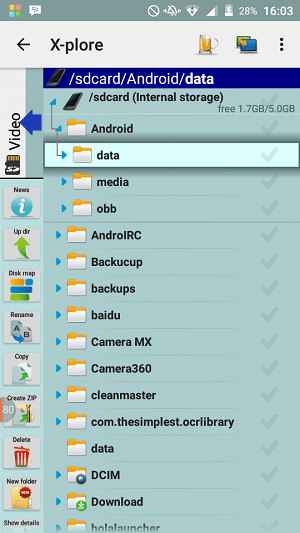
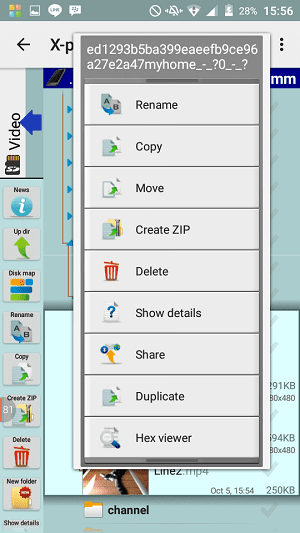
Segera setelah selesai menonton video tersebut, buka aplikasi X-plore File Manager. Lalu buka folder SD Card (Internal Storage)/Android/data.


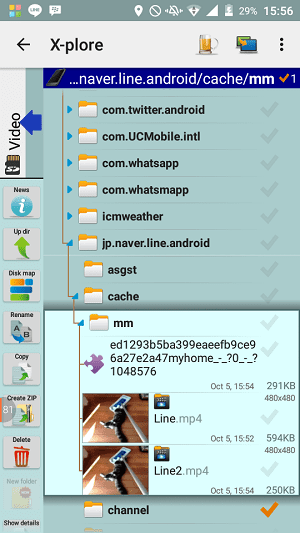
Lalu silakan cari folder jp.naver.line.android/cache/mm/. Perlu diingat, isi di dalam folder ini hanya bersifat sementara jadi dalam beberapa menit akan hilang.


Silakan cari file terbaru (bisa dilihat dari tanggal yang tertera), lalu rename file tersebut dengan menambahkan ekstensi .mp4 pada namanya.


Segera pindahkan file tersebut ke folder lain setelah selesai di-rename.

Nah, berikut tadi cara untuk menyimpan video dari LINE. Kamu punya cara lain? Boleh dong dibagi juga.


http://www.seocips.com/


M Membuat efek loading jam dan tanggal di Blogspot. Baiklah sobat seocips.com, pada kesempatan ini seocips akan membagikan tutorial Blog tentang bagaimana cara membuat efek loading page yang menampilkan jam dan tanggal di Blog.


Tutorial berikut ini cukup keren untuk sekedar mempercantik tampilan Blog sobat, misalnya ketika salah satu link di blog anda di klik orang maka akan muncul efek ini. Cocok untuk blog yang memiliki loading yang berat ( kayak blog ini gan ) soalnya kalau untuk blog yang memiliki loading yang cepat efeknya hanya tampil sekilas sekejap mata.. hehehe.


Loading Page Jam dan Tanggal

Ok berikut cara membuatnya.


  1. Seperti biasa, Pilih Blog di Blogger sobat.
  2. Klik Template » Edit HTML
  3. Kemudian tekan cari kode </head> ( tekan tombol Ctrl+F untuk mempermudah pencaharian.
  4. Lalu tambahkan script CSS berikut ini tepat diatas kode </head>
<style type='text/css'>
#clockdate-full { position:fixed!important;top:0px;left:0px;width:100%;height:100%;background:#333 url(https://blogger.googleusercontent.com/img/b/R29vZ2xl/AVvXsEj-dI0IJ7ZFiHI-oZ1zmySzl_pLsj8gNEjaTdzhwmiVBsLPkTVKpLOwqF7NwcSkO244DsXu2NIi_FWoIiR5hP7Qji_5Rv4dXURxXJ7fvhjOtnEB5rct2wFEiNaGKGteGp1YMUZ8uNbNnPb2/s1600/ajaxloader.gif) no-repeat center 85%; z-index:+100000; cursor:default; display:none; }
.wrapper-clockdate { padding:25px; max-width:600px; width:100%; text-align:center; -webkit-border-radius:3px; border-radius:3px; margin:0 auto; margin-top:15%; -webkit-box-shadow:inset 0px 0px 10px #222; box-shadow:inset 0px 0px 10px #222; -webkit-border-radius:5px; border-radius:5px; background-color:#333333; }
#clock-large { font-family:Orbitron, sans-serif; font-size:60px; text-shadow:0px 0px 1px #fff; color:#fff; }
#clock-large span { color:#888; text-shadow:0px 0px 1px #333333;font-size:30px;position:relative;top:-27px;left:-10px; }
#date-large { letter-spacing:15px; font-size:14px; font-family:arial,sans-serif; color:#fff; }
</style>
  • Cari kode </body> dan masukan script di bawah ini tepat di atas kode </body>
<script type='text/javascript'>
//<![CDATA[
// Animasi Loading
 $(document.body).append('<div id="clockdate-full"><div class="wrapper-clockdate"><div id="clock-large"/><div id="date-large"/></div></div>');
$(window).on("beforeunload", function() {
    $('#clockdate-full').fadeIn(500).delay(5000).fadeOut(1000);
});
// Jam Besar
function showTime(){var a_p="";var today=new Date();var curr_hour=today.getHours();var curr_minute=today.getMinutes();var curr_second=today.getSeconds();if(curr_hour<12){a_p="<span>AM</span>"}else{a_p="<span>PM</span>"}if(curr_hour==0){curr_hour=12}if(curr_hour>12){curr_hour=curr_hour-12}curr_hour=checkTime(curr_hour);curr_minute=checkTime(curr_minute);curr_second=checkTime(curr_second);document.getElementById("clock-large").innerHTML=curr_hour+" : "+curr_minute+" : "+curr_second+" "+a_p}function checkTime(i){if(i<10){i="0"+i}return i}setInterval(showTime,500);
// Tanggal Besar
var months=["Januari","Februari","Maret","April","Mei","Juni","Juli","Agustus","September","Oktober","November","Desember"];var myDays=["Minggu","Senin","Selasa","Rabu","Kamis","Jum&#39;at","Sabtu"];var date=new Date();var day=date.getDate();var month=date.getMonth();var thisDay=date.getDay(),thisDay=myDays[thisDay];var yy=date.getYear();var year=(yy<1000)?yy+1900:yy;document.getElementById("date-large").innerHTML="<b>"+thisDay+"</b>, "+day+" "+months[month]+" "+year;
 //]]>
</script>


  • Simpan template dan lihat hasilnya.


Bagaimana apakah sobat puas dengan Loading Page Jam dan Tanggal Di Blog ini? selamat mencoba.


TUTORIAL SAMSUNG TOOL Z3x BOX + DOWNLOAD LINK


Survey membuktikan, hampir 80% kerusakan ponsel saat ini disebabkan karena perangkat lunak atau software yang bermasalah. Itu dikarenakan Sistem kerja pada ponsel ponsel terbaru hampir 70% menggunakan sistem komputerisasi yang akan menentukan kinerja ponsel seperti halnya komputer.Dengan kecanggihan yang terus berkembang dan minimnya pengetahuan pengguna ponsel dalam hal megopersikan bisa menyebabkan system ponsel jadi amburadul ujung ujungnya software ponsel bermasalah seperti HANG, RESTART bahkan MATOT.
Solusi untuk memperbaiki kerusakan software kita tidak perlu melakukan penggantian komponen, cukup lakukan program ulang atau flashing pada ponsel tersebut. Berikut dibawah ini kami kupas secara tuntas bagaimana cara memperbaiki kerusakan software pada ponsel Samsung menggunakan metode flashing via Z3X BOX.
Z3X box merupakan box repair khusus untuk reparasi kerusakan software ponsel LG dan Samsung. sebelumnya pernah kami bahas juga secara detail box repair Z3x box khusus untuk LG.kali ini kami akan mengupas secara tuntas z3x box untuk ponsel Samsung.Berikut dibawah ini kupas tuntas z3x box mulai dari fitur box,cara instalasi,registrasi box dan cara memperbaiki kerusakan software pada ponsel Samsung dengan metode flashing menggunakan box repair Z3x box.

I.Instalasi Software Shell
1.Klik ganda pada Installer Z3x-Shell untuk memulai instalasi pertama.


2.Pada Select Setup Languange pilih English lalu klik ok


3.Kemudian Klik next untuk melanjutkan proses instalasi software shell.


4.Pada Information klik Next


5.Sebaiknya Select Destination Location pilih pengaturannya standart lalu klik next


6.Klik Instal apabila proses instalasi sudah siap.


7.Tunggu Proses instalasi Software Shell berjalan sampai selesai


8.Hilangkan tanda centang pada Launch shell lalu klik Finish


II.instalasi software utama Z3x Box
1.Klik 2x pada 2G_tool_3.4.0040 untuk melakukan instalasi software utama Samsung.


2.klik Next untuk melanjutkan proses instalasi software utama


3.Klik Ok pada area Select Setup Languange


4.Sebaiknya pada Select Destination Location pilih pengaturannya standart lalu klik next.


5.Klik Next untuk melanjutkan proses instalasi software utama


6.Pada Additional icons tandai pada Create a desktop icon lalu klik next


7.Kemudian Klik Instal untuk memulai proses instalasi software Samsung Tool


8.Tunggu Proses instalasi berjalan sampai selesai


9.Kemudian klik finish untuk mengakhiri proses instalasi software utama


10.Setelah instalasi software utama selesai , akan muncul Icon Samsung tool di desktop computer.


III.instalasi software utama Samsung Qualcom
1.Setelah software utama Samsung telah di install,install software tambahan untuk reparasi Samsung jenis qualcomm dengan cara klik ganda pada Samsung Qualcomm_tool_6.4.05 untuk versi terakhir.


2.Pilih English untuk standart bahasa yang akan di gunakan lalu klik ok


3.Klik Next untuk melanjutkan proses instalasi software Samsung Qualcomm.


5.Pada Additional Icons tandai pada Create a desktop icon lalu klik Next.


6.Klik Install untuk memulai proses instalasi software utama


7.Tunggu Proses instalasi berjalan sampai selesai lalu klik Finish untuk mengakhiri proses instalasi.


IV.pasang box Z3x Samsung
1.Langkah berikutnya Pasang Z3x Box ke computer, apabila Komputer belum mengenali driver box yang baru di pasang ambilkan driver secara manual.


2.Cari lokasi Driver di alamat C:\Program Files\Z3X\Samsung\all\USB Drivers lalu klik ok


3.Pastikan Alamat driver untuk box Z3x sudah benar kemudian klik next


4.Klik continue Anyway untuk melanjutkan proses instalasi driver.


5.klik finish untuk mengakhiri proses instalsi software utama Samsung tool


V.Registrasi Box
Setelah Instalasi software utama dan box Repair Z3X Box sudah terpasang dengan baik.
Langkah selanjutnya untuk Z3X Box yang baru beli harus di lakukan Registrasi terlebih dahulu.
Berikut di bawah ini langkah langkahnya.
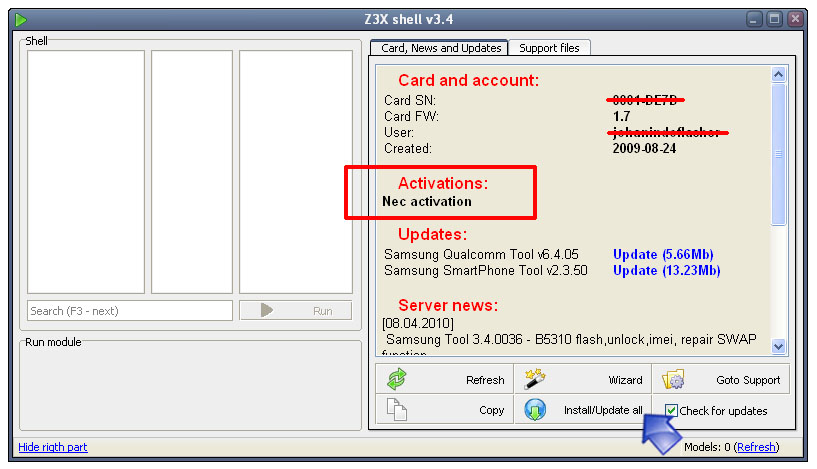
1.Jalankan program Z3X shell v3.4 kemudian Klik pada Install/Update all untuk mengaktifkan box repair Z3x box Samsung


2.Pilih Update card firmware lalu klik Next


3.Lalu klik Next untuk melanjutkan proses update card terlebih dahulu.


4.Untuk Proses Update card dan Registrasi Box repair Z3X Box,Komputer harus terhubung dengan internet (Online).


5.Tunggu Proses Update card firmware secara Online sampai selesai, pastikan koneksi internet bagus.


6.Muncul dialog box Card firmware updated ! Berarti proses Update Card Box ini sukses lalu klik OK


7.Pada Menu Make activation tandai pada Samsung activation lalu klik Next.


8.All Done, yang berarti proses aktifasi untuk Samsung telah selesai


9.Lihat pada Informasi Card, News and updates box Z3X BOX untuk reparasi software pada ponsel Samsung sudah bisa digunakan.


III.Metode Flashing Samsung Qualcom
Untuk mengatasi kerusakan software pada ponsel Samsung seperti Hang,Blank Restart dan Matot bisa dilakukan perbaikannya dengan cara Flashing.Berikut cara flashing ponsel Samsung dengan menggunakan Z3X box.
1.Klik 2x pada Icon Qualcomm Tool untuk membuka software utama Samsung Qualcomm.


2.Software Utama Samsung Qualcomm Tool v6.4.05 sudah terbuka berarti Z3X Box dan computer sudah terhubung dengan baik


3.Setelah kabel flash sudah terpasang dengan baik Pilih Type ponsel yang sedang di perbaiki, misal pada kasus kali ini ponsel Samsung Z170


4.Klik Search phone untuk mengetahui koneksi ponsel dan Z3X BOX


5.pada Log akan memberikan informasi , jika ada pesan Searching phone at COM interface…ok. berarti koneksi sudah baik dan siap untuk melakukan flasing.


6.Masuk ke area Firmware lalu klik ganda untuk melakukan pengisian firmware atau data program secara manual.


7.Isikan Firmware sesuai dengan jenis ponsel yang sedang di perbaiki.Untuk Firmware Samsung tipe Z170 isikan firmware dengan akhiran *CRP .


8.Firmware yang telah di isikan tadi akan terbaca pada Log software utama Samsung Qualcomm Tool yang akan memberikan informasi versi firmware yang dipilih.


9.Klik Update firmware untuk menjalankan proses flashing.


10.Pastikan pada saat kita melakukan flashing batterai pada ponsel harus penuh,minimal 80%.


11. Apabila ada pesan Confirm pada dialog box klik Yes untuk menyetujui proses flashing akan dilanjutkan.


12. Pada saat proses Flashing berjalan, pastikan koneksi ponsel dan box masih terhubung dengan baik.


13.Tunggu proses flashing berjalan sampai selesai, untuk lama waktu proses flashing Samsung menggunakan Z3X BOX kurang lebih dari 3 menit.


14. Apabila ada pesan Flashing Done berarti proses flashing telah selesai dengan baik.


Metode Flashing Samsung Tool
1.Untuk Jenis ponsel Samsung terbaru bisa kita jalankan program Samsung tool Z3X box dengan cara klik ganda pada Icon Samsung Tool


1a.Software utamas Samsung jenis terbaru sudah terbuka,berarti koneksi Z3X BOX dan Komputer sudah terhubung dengan baik.


2.Masuk area Model lalu pilih tipe ponsel yang sedang di perbaiki,misalkan pada kasus kali ini ponsel Samsung D900i.


3.Kita bisa lakukan pengaturan Com Port secara manual,jika box dan computer masih belum terhubung dengan baik.


4.Masuk area Flash files lalu pilih pada BIN, CLA untuk melakukan pengisian firmware utama atau MCU.


5.Isikan Firmware utama atau MCU sesuai ponsel yang sedang diperbaiki dan dengan ekstensi file CLA.


6.Masuk lagi pada area Flash files kemudian pilih TFS untuk mengambilkan firmware pendukung.


7.Isikan Firmware pendukung dengan ekstensi *tfs dan sesuai dengan ponsel yang diperbaiki.


8.Pastikan Firmware utama dan Firmware Pendukung sudah terisi dengan benar. kemudian masuk pada menu Write lalu Klik Firmware untuk menjalankan proses flashing.


9.Apabila pada Log ada pesan Please, connect phone and press shortly power button lakukan sistemkejut pada ponsel dan tunggu proses flashing berjalan sampai selesai.


Semoga bermanfaat (d3)

- Copyright © Unleashed Technology - Devil Survivor 2 - Powered by Blogger - Designed by Johanes Djogan -