It is a very common need to create charts to show in web pages. There are, of course, several tools you can use. I sometimes rather create the chart myself and keep control of every detail and fix eventual bugs.
Let's learn how to create a very simple HTML with a chart with the following steps:
create a html file
link this file with an external css file
create the html code that will contain the chart
create the css code that will give the chart its appearance
include a css code in the html file to set the size and color of each column
The chart will not include any image nor javascript. To understand this tutorial you do not need to know any programming language. Of course if you do and are willing to use such resources you could make the chart much better. Nevertheless for you to create automated charts you'll benefit from knowing how to build them using HTML/CSS anyway.
Creating an html file
If you have an HTML file this is of course unnecessary (or if you already have a program generating it). If you don't have it, create it using a text editor. You can use Gedit (under Gnome), Kate (under KDE) or Bluefish (under Windows) or, better yet Vim or Emacs if you are willing to use advanced and powerful tools.
Create a new file and type the following:
Chart example with HTML and CSS
The line makes complex characters to display correctly. The line create a link between this HTML file and the CSS file that we will create next.
Chart HTML code
Let's build our chart. The html of the chart is made up with divs. A div is usually used to create limit a space in the page, a rectangle, which dimensions and details we will set in our CSS file.
We'll create a div to contain the whole chart. It will be large and have a thin silver border. Inside it we'll create another div that will work as a container to be used if a customization of the chart is needed without changing the borders. The use of containers is quite common and is usually helpful when creating CSS. Now we basically have a box inside another. Our next step will be to create another set of x boxes (in our example x will be 5). HTML is usually rendered from left to right and from top to bottom. Our chart will be a bar chart. The bars grow from bottom up. To obtain this effect we will need to place another box inside each column. To get this done we will need to place another box inside each column. This is because we will need to set to the columns two rules. Each bar should be rendered to the right of the previous and should start from bottom and grow up. A regular box in html starts on top and grow down. Here is the code:
NY


Boston


LA


Houston


Washington
If you are not really used to deal with HTML and CSS note that the elements receive attributes in the form of class="column" or class="fill" or class="x". Classes are great tools to organize our code. HTML do not really set the look of the page. This is done with another language (CSS) that will need to reference the elements it want to theme. We'll largely do this using classes.
Creating the CSS code
CSS stands for Cascading Style Sheet. It is a language used to create the style of a document, that means: it's looks. It is a rather simple language that can be used to achieve very interesting and even complex looks. It is mostly used to theme texts: making paragraphs and titles look nice, but we'll use it here to create a chart.
You should keep in mind HTML is usually used to create texts and therefore it's rules and definitions are specially good to this need. There are some extra difficulties when we use it to other goals. You will, of course, timely learn to overcome them.
Let's edit the chart.css file, that is called by the chart.html file we just edited. Note that the link we established between them sets only the name of the file, not it's path. This means the computer will assume they are at the same folder.
Let's continue:
We'll set for chart div a width of 450 pixels (450px) and a 300px height. Next we will set a silver thin border and, finally we will make it have an inner margin (padding) of 10px, that means 10px between the content and its border.
We will make each column have a width of 80px and a height equal to the height of the box the bar is in, that means: 100%. When we establish that an element has 100% height we are making it occupy the whole space available to it. As the column is inside a chart div, we are saying it will fill the whole available space inside that div. We will also make it have margins of 2px above and bellow and 5px to the left and right. This way columns there will be a space of 10px between each column.
Now we get to the most sensitive part of our tutorial. The HTML elements may be positioned differently depending on what they are. Texts, for instance, are rendered from left to right, occupying all the available space to the right of the previous text, if it fits. Blocks, on the other hand, are positioned one bellow the other, regardless of any available space to the right of the previous. Our columns are blocks and will be positioned one bellow the other unless we do something about it. We need to tell our columns to float to the left, that means, to behave like text would, so they will open some space to their right for other blocks to fill it.
Note: when an element floats it is as if it had opened up some space for others to fill it and not as if it was trying to fill the space left open by others.
Continuing the most important part: we will now make each column have a relative position to it's parent. The parent element is the element inside which the column is, that is the column-container div is the parent of the column div. It is important to establish that the column has a relative position because it is possible to set absolute positions relatively to the parent relative position. Confusing, isn't it? Let me try to fix it ahead, OK?
The result we'd have now would be a big box with a silver border and several columns inside it, going from the base to the top, but they'd be invisible, as we defined no background color or borders. Notice that the columns will all be the same size and will always cover from base to top. For us to fill each column differently we will create another inner element, which we called fill, to receive the filling color. We will make the fill color with a 100% width and each with a different height. The fill element will be positioned absolutely in the base of the column.
We are now back to the question of the absolute positioning. We want the filling of the column (the visible part of the bar) to stay in the bottom of the chart. We want it always to be, regardless of it's size, in the bottom. We will do this by setting to fill an absolute position. When we do this it gains an absolute position relative to the page and this would place all colors of the chart in the same place, and we would only see the last one. That is why we need to give each element an absolute position to a different reference. It happens the absolute position is actually relative to something, usually the page itself. Thus, an element positioned 20px to the top will be 20px to the top of the page. An element with an absolute position that is place inside an element with a relative position, though, is positioned absolutely to its parent. This is why we set column div to have position relative and to float left. Fill div is position absolute and is 0px from base.
Now we need so save the file and proceed to the last part of our chart.
Setting the colors and the height of each column of the chart
Let's set the colors and the height of each column using a CSS code embedded in the HTML code. The reason we will use thes HTML embedded instead of simply including it in the chart.css file is this: we usually do not writ HTML code directly in the HTML file, instead we write a script that do this for us - this is called dynamic page. CSS files, on the other hand, are not usually "dynamic" and therefore are not created within scripts. So, elements that may change usually go in the HTML files and elements that will not change are placed in CSS files. In our chart colors and height may change with changes in the data. Although our chart is static (written directly in the file) and not dynamic, we may want to make it dynamic someday.
To include an embedded CSS in the HTML we use the tag style. In it we set the color and the height of each column. Let's see the code:
Note the attribute nth-child allows us to reference a specific child of an element. The first, second and, of course, nth element.
Imagine your boss comes very anxious at work and ask you an unholy task: he has a spreadsheet with 600 lines and he needs you to fill a form on the web for each one of them. He expects you access this form and fill every field some 600 times.
Well, there's a very interesting Firefox plugin called iMacros that will make your task a lot easier. iMacro allows you to record and play Macros. That means you click the REC button, do what you got to do and then click the STOP button. You then save the macro under any name you want and you are a click away from getting Firefox to do it all over again by itself. Neat.
In Firefox, click Tools > Complements and search for iMacros (or use the above link). After installing it will be necessary to restart Firefox. Once restarted you will see an icon before the address bar (there is a green gear in the icon). Click this icon and a side panel will show.
Notice that the panel has three tabs: "Use", "Record", "Edit".
Let's make a test: click "Record". He will ask if you want to close the other tabs (if there are any other opened) and after that it will be recording. Surf the web a little, access Google, make a little search and than press "Stop". All that you have done is recorded, you may click "Save" button to name your Macro. If you don't, it will remain under the name "#Current.iim" and will be override as soon as you record a new macro. If you name your macro you will be able to easily find it in the future if you need.
Now click the "Use" button and you will see your browser working by itself, going through all pages you went before and typing everything you typed.
Filling a form based on a CSV file
Let's do it. We will use a spreadsheet to fill automatically the fields of a web form.
Step 1 - Recording a macro
Access the form your boss asked you to fill. Set iMacro to record and fill every field. Save the macro with a familiar name.
Step 2 - Preparing the csv file
iMacro doesn't work with Excel or LibreOffice. You'll need to open the spreadsheet and save it in CSV format. It will be necessary to remove any merged cells the file may contain.
With LibreOffice, when saving your spreadsheet, you'll be asked what symbol to use as a column separator and what text delimiter to use. Column separator should be the comma , and text delimiter should be double quotes. Save the CSV file with a simple name (no spaces or complex chars).
iMacro uses only files saved at the folder iMacros/Datasources that should be located in your personal folder (in Linux, usually /home/username/iMacros/Datasources)
Step 3 - Editing the macro file
We need to edit the saved Macro, otherwise it will always fill the form with the same values.
Open the folder iMacros/Macros (/home/username/iMacros/Datasources) and look for the file with the name you gave you macro. If you named your macro "testing" it will be named "testing.iim".
Open the file.
In the beginning of the file (after TAB T=1, if it is there) you will need to identify the file that will be used as source of the data we want to upload. Let's set the following variables:
!DATASOURCE as the name of the file that contain the data (CSV file);
!DATASOURCE_COLUMNS the number of columns the file contains (this number must be accurate);
!LOOP the number of the line that contains the first line of data (if your file has 2 lines of header use 3, if your file has no header use 1)
Here is the result for our example:
TAB T=1
SET !DATASOURCE data.csv
SET !DATASOURCE_COLUMNS 3
SET !LOOP 1
SET !DATASOURCE_LINE {{!LOOP}}
Now let's work the macro loop (the rest of the document). Check out the code iMacro generated. You will notice that it refers to the fields you filled and the positions your mouse clicked. Carefully find the which lines in the Macro corresponds to each field of the web form. Identify also the number of the column where the information for each field is saved in the data file.
For each field you will find in the code something similar to "CONTENT = Adam Smith", for instance, to write "Adam Smith" in the form field. Replace the value written in the recorded Macro (the value you typed in the web form) for the column identifier. The column identifier will have the following syntax: {{!COL1}}, where 1 should be replaced by the number of the column that has the data. Thus, for a data located at the first column, use {{!COL1}}. For data at the second column, use {{!COL2}}.
Now let's check our example:
URL GOTO=http:/testing-url.test
TAG POS=1 TYPE=INPUT:TEXT FORM=ACTION:/node/add/pericia ATTR=ID:edit-title CONTENT={{!COL1}}
TAG POS=1 TYPE=INPUT:TEXT FORM=ACTION:/node/add/pericia ATTR=ID:edit-field-tipo-pericia-0-nid-nid CONTENT={{!COL2}}
TAG POS=1 TYPE=INPUT:SUBMIT FORM=ID:node-form ATTR=ID:edit-submit
Step 4 - Running the macro
It's now all set. Now you need to go to your browser and click at the "Use" tab. There you will find the "Use (loop)" button. Notice that above it there is a field "Max". Fill the "max" field with the number of lines you want to fill. That is, if your file has 500 lines and you want to fill up to the line 499, type 499. Now, click the "Use (loop)" button and iMacro will execute it. It will fill the form one time for each line in the data.csv file up to the 499th line.
Step 5 - Learn more
I am not sure if I explained it enough, but I learned it reading the iMacro wiki. You'll get a lot of info there.
Here is the code I've recently used as an example. I've experienced some problems related to the CSV file. It really needs to be saved with commas as column separators and double quotes as text delimiters. I suggest using LibreOffice calc to export CSV or editin CSV directly. Lot's of people had trouble using Excel.
TAB T=1
SET !DATASOURCE lista_dos_produtos_a_carregar.csv
SET !DATASOURCE_COLUMNS 3
SET !LOOP 1
SET !DATASOURCE_LINE {{!LOOP}}
URL GOTO=http://examplesite.test
TAG POS=1 TYPE=INPUT:TEXT FORM=ACTION:/node/add/pericia ATTR=ID:edit-title CONTENT={{!COL1}}
TAG POS=1 TYPE=INPUT:TEXT FORM=ACTION:/node/add/pericia ATTR=ID:edit-field-tipo-pericia-0-nid-nid CONTENT={{!COL2}}
TAG POS=1 TYPE=INPUT:SUBMIT FORM=ID:node-form ATTR=ID:edit-submitfrom: http://ndvo.blog.br/
Selain layanan chat, panggilan suara dan video chat, LINEmemiliki fitur Home. Pada fitur ini, pengguna bisa berbagi status berupa teks, foto atau video. Selain untuk mengekspresikan perasaan kamu, LINE Home juga bisa digunakan untuk menghibur diri dengan menikmati apa yang dibagikan oleh teman LINE kamu. Tak jarang, selalu ada video menarik yang dibagikan oleh teman bukan?
Jika ada video yang menarik, pasti tergelitik untuk menyimpan video tersebut. Namun sayangnya LINE tidak menyediakan fitur untuk menyimpan video langsung dari LINE Home. Lantas, bagaimana cara menyimpan video dari LINE Home?
Cara Mudah Download Video di LINE for Android
Jaka akan berikan tutorial agar kamu bisa menyimpan video dari LINE.
Untuk memudahkan prosesnya, kamu terlebih dahulu harus menginstal X-plore File Manager. Atau gunakan aplikasi lain seperti Root Explorer.
X-plore File Manager 3.85.00 Productivity by Top Free Games.
Download Google Play
Di halaman LINE Home, silakan cari video yang menarik. Lalu putar video tersebut hingga selesai. Jangan menyentuh permukaan layar smartphone selama video tersebut diputar, karena akan mengganggu hasil video yang akan disimpan.
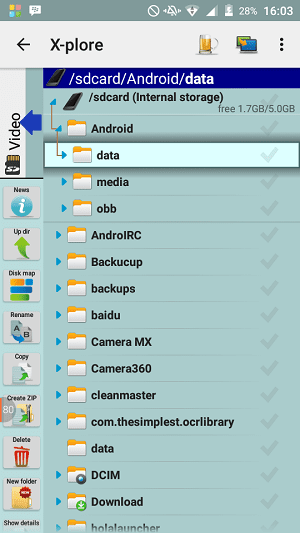
Segera setelah selesai menonton video tersebut, buka aplikasi X-plore File Manager. Lalu buka folder SD Card (Internal Storage)/Android/data.
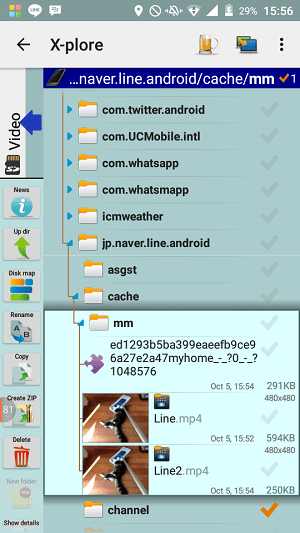
Lalu silakan cari folder jp.naver.line.android/cache/mm/. Perlu diingat, isi di dalam folder ini hanya bersifat sementara jadi dalam beberapa menit akan hilang.
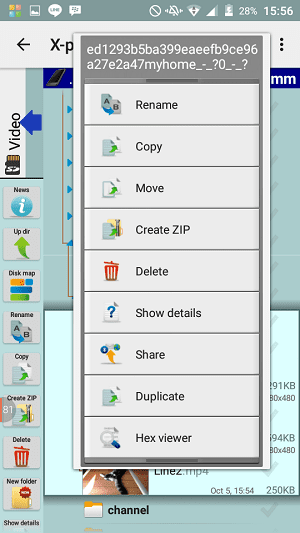
Silakan cari file terbaru (bisa dilihat dari tanggal yang tertera), lalu rename file tersebut dengan menambahkan ekstensi .mp4 pada namanya.
Segera pindahkan file tersebut ke folder lain setelah selesai di-rename.
Nah, berikut tadi cara untuk menyimpan video dari LINE. Kamu punya cara lain? Boleh dong dibagi juga.
Remove Footer Credit Link from Blogger Template without Redirecting to Any Website
Many websites are available on the internet which provides very stylish blogger template at very low cost. If you purchase their template than that template will not contain any credit link. These websites also provide most of the free blogger template with Non-removable credit link. Means, what? If you’ll try to remove credit link from their template, then your blog will automatically redirect to their website(Homepage or a particular site). This is because they added some JavaScript into their free templates. In other hand, if you undo the changes and keep their original credit of template then it works perfectly.
Some days ago, I have visited one of these types of Blogger template websites where I have seen what? that some peoples (newbies blogger) are requesting how to remove credit/footer link from their template and the admin and other staff members are making jokes of that requests which result in creation of this topic.
Basically, newbies blogger don’t want to invest money in purchasing any premium template and thus, use these types of free template for their blog. Many of them are trying to remove credit link but unsuccessful, if you are one of them then no need to wait more. Because here I have shared the method by which you can remove footer link and stop redirecting to any website.
How to Remove Credit Link?
Actually, these links are attached with some JavaScript or CSS. Finding JavaScript from the template and then removing is too boring and time-consuming also it requires lot’s of effort to do this. But in other hand, you can easily hide the credit/footer link via CSS. This method is very simple and takes only 2 minutes.
Steps to Remove Credit/Footer Link:
First of all, go to Blogger.com
Just Login to your Blogger Profile and select your blog.
Now go to Dashboard > Template > Edit HTML.
Go to the footer and find the credit/footer link which needs to remove/hide. You’ll find something like Copyright, credit or designed etc (Like the picture shown below).
Add the following line with your original copyright ID. (As shown in picture below).
style=”visibility: hidden”
Now, you need to Save your Template.
Conclusion:
Some of you are searching on the internet how to remove footer credit link and convert free blogger template into premium. So, I hope this tutorial helps you. Share your idea/suggestion/feedback related to articles I publish here. Thanks, and stay tuned.
How to Remove Footer credit Template from Themes 24x7
1First :
Go to Dashboard > Template > Edit HTML.
The code you have to remove starts with
var _0xe490 and ends with 3000 ) ; } );
Something like this :
note : there are 2 until 4 code like above (try find that all)
2Second :
Find something like this :
Powered by Please Do Not Remove Shared Credits Link
a href='http://www.themes24x7.com/' id='sd' Themes24x7
Please Do Not Remove Shared Credits Link
Remove id='sd' first and then remove the link if you wish you can also remove Please Do Not Remove Shared Credits Link and Please Do Not Remove Shared Credits Link you can completely remove the code or you can change it.
Done : Save the template and go back to your site (refresh the page if already open) and see the changes .
from : https://tutorialsoftwaregratis.blogspot.com/2015/11/10-antivirus-terbaik-dunia-saat-ini.html
Antivirus Terbaik Dunia saat ini masih di duduki oleh antivirus yang akan kami ulas disini. Antivirus, salah satu aplikasi yang tidak kalah penting untuk di instal d laptop anda. Untuk menjaga kesehatan laptop dari serangan virus-virus jahat yang bisa merusak tatanan sistem. Banyak hal sebenarnya untuk menjaga kesehatan laptop kita. Anda bisa melakukan defragment pada laptop anda setiap bulan. Selain itu menjaga kesehatan laptop juga bisa dilakukan melalui pola kerja dari laptop sendiri. Nah, namun pada kesempatan kali kami akan membatasi pokok bahasan pada merawat laptop dengan menggunakan antivirus. Dengan adanya artikel tentang Antivirus terbaik dunia ini, kami berharap anda bisa mengetahui sepenting apakah antivrus bagi laptop. Dan juga anda bisa memilih antivirus yang baik untuk laptop anda. Namun tetap ingat, menginstal banyak antivirus dalam laptop juga dinilai kurang baik. Okey sekarang mari kita simak penjelasan selengkapnya tentang Antivirus Terbaik Dunia. Semoga bisa membantu anda sekalian.
Antivirus Terbaik Dunia
Pada kesempatan kali ini kami akan memberikan informasi seputar antivirus terbaik yang sangat populer di planet ini. Tujuan kami adalah supaya anda bisa memiliki pandangan dan juga referensi antivirus mana yang harus anda pilih. Tidak hanya namanya saja, disini nanti akan kami paparkan detail selengkapnya, semoga bisa bermanfaat untuk anda.
1. Avast
Avast sudah dilengkapi dengan antarmuka yang terorganisir dengan cukup baik sehingga akan lebih memudahkan pengguna dalam memanfaatkan semua fitur yang ada di dalamnya.
Beberapa kelebihan Avast aantara lain real-time protection, update definisi virus secara rutin, proses scanning sangat cepat dan sangat ringan. Yang sedikit mengganggu barangkali adanya boot scanner saat booting/start up, tapi adanya fungsi ini sebenarnya cukup berguna sebagai pemindaian komputer sebelum sistem operasi berjalan secara penuh, dengan demikian file system akan lebih aman dari serangan virus.
Fitur lainnya yaitu anti-rootkit, code emulator, heuristics engine, boot-time scanner, command-line scanner, wake-up for scan, scheduled scanning, intelligent scanner, shields, behavioral honeypots, network shield, CPU optimization, green computing dll.
Kelebihan Antivirus AVAST :
Avast Home Edition menawarkan anti virus, worm, trojan, boot time scanner, feature screen saver scaner membuat antivirus ini dapat bekerja sebagai screen save
Scanning cepat
Tampilan AVAST cukup menarik
Online update
Compatible Windows XP, Vista, Seven
AVAST menggabungkan teknologi anti-spyware dengan jaminan dari West Coast Lab’s Checkmark process dan anti-rootkit nya
Realtime protection
Memiliki fiture karatina
AVAST bisa digunakan sebagai screen saver
Kekurangan Antivirus AVAST :
AVAST belum memiliki file update offline sehingga update harus dalam keadaan online.
Seleksi virus lokal kurang handal
Terkadang AVAST tidak bisa heal virus infection.
2. Avira
Kelebihan Antivirus AVIRA :
Snanning virus lebih cepat dan teliti.
AVIRA dapat mendeteksi virus-virus yang biasanya tidak terdeteksi oleh antivirus yang lain.
Setting option pada AVIRA lebih mudah (aktif/ non aktif antivirus)
AVIRA tidak memberatkan komputer.
Update lebih cepat.
AVIRA memiliki opsi pencarian nama virus.
memiliki fiture Schedule option.
AVIRA memiliki Anti Spyware
Kelemahan Antivirus AVIRA:
Seperti AVG, AVIRA terkadang menganggap file yang ber-extension EXE sebagai virus terutama pada file-file krack dan keygen.
AVIRA memiliki kapasitas file untuk update manual cukup besar didownload.
3. Bitdefender
BitDefender adalah satu provider antivirus milik Romania yang lumayan bagus dalam pendeteksian virus. Pada review AV-Test, BitDefender mendeteksi sekitar 97% lebih virus yang dites, yaitu sekitar 1,3 juta lebih. Pendeteksian ini memang kalah sekitar 2% dari Avira. Namun, pada Avira, Avira tidak mendeteksi adanya Hack Tool dan pendeteksian Back Door program juga kecil. Pada BitDefender hampir 100% potensial Hack Tool dan Back Door program bisa terdeteksi, temasuk Patch untuk BitDefender yang saya gunakan. Memang, tidak ada antivirus yang dapat mendeteksi virus 100%, karena setiap antivirus pasti memiliki kelemahan dan kekurangannya masing-masing.
kelebihan BitDefender Antivirus adalah :
Dapat scan trafik semua layanan web, email, dan instant messenger dari virus dan spyware secara realtime.
Proteksi proactive dari virus-virus baru dengan advanced heuristic.Blok usaha pencurian identitas (phising)
Mencegah terbukanya informasi personal baik via email,web atau instant messenger
Fasilitas baru, Instant Messenger Encryption (Yahoo! Messenger v8 dan Windows Live Messenger v8.5 )
Dapat mengurangi loading sistem, dan menghindari interaksi user ketika menjalankan game.
Hanya dengan menggunakan sedikit sistem resources
Laptop Mode, dapat mempertahankan daya tahan batterai
Family Network Protection
Update tersedia setiap jam
4. Kaspersky
Kelebihan Antivirus Kaspersky :
Kaspersky memiliki Scheduled Update (3 jam sekali).
Musah dioperasikan.
Tampilan Kaspersky cukup bagus dan menarik.
Memiliki fiture suara.
Memiliki fiture self defense (password protection).
Memiliki Anti malware
Kaspersky memiliky system restore.
Kekurangan Antivirus Kaspersky :
Loading awal lebih lama.
Proses scanning relatif lama.
Kaspersky tidak ada versi gratis.
Update cukup lama.
Mode resident Kaspersky sedikit memperlambat kerja komputer.
Sengaja kami memang hanya menyediakan beberapa kelebihan dan kekurangan dari Antivirus Terbaik Dunia supaya nantinya anda mengetahui antivirus yang cocok dengan laptop anda. Tetapi harus diingat lagi. Tidak baik menginstall banyak antivirus dalam satu laptop. Nah, silahkan dilanjutkan lagi bacanya. Kami masih ada satu artikel menarik lainnya. seperti 5 Aplikasi Download Video, Cepat! semoga bisa bermanfaat.
5. Norton
Kelebihan :
Menye-scan dengan teliti sampai ke seluk beluk tetapi tidak menghabiskan waktu
Memiliki banyak versi dan semuanya memiliki kelebihan tertentu
Memiliki Lan Guard yang dapat menye-scan data yang akan di share
Data yang terinfeksi dapat diperbaharui 50%, dihapus 25%, ditahan 15%, tidak tahu 10%
Kekurangan :
Norton sangat lamban dalam startup-nya (harus selalu sabar menunggu proses program ini)
Kadang virus yang dibawa dari flashdisk atau CD bisa dibiarkan lewat (ada juga yang tidak)
6. AVG
Kelebihan Antivirus AVG:
Instalasi AVG cukup mudah..
Auto update selama online (scheduled update).
AVG bisa diinstall pada browser Mozilla Firefox sebagai plugin sehingga surfing lebih aman.
Scanning virus cepat.
Memory yang dipakai pada PC tidak terlalu banyak.
Resident option tidak memperlambat kerja komputer.
Memiliki fiture Anti Spyware, Link-Scanner, Email-Scanner.
Anti Spam
Game Mode
Anti Rootkit Protection
Kekurangan antivirus AVG:
Instalasi pertama cukup lama apalagi untuk versi terbaru (AVG 9)
Cara setting pengoperasian sedikit lebih rumit.
File yang terkena virus biasanya dihapus oleh AVG bersama dengan virusnya.
AVG biasanya bergantung pada sytem operasi komputer yang digunakan.
AVG Terkadang menganggap file yang ber-extension EXE sebagai virus terutama pada file krack.
Update AVG bisa lama.
7. Eset Nod32
Kelebihan
Proses booting cepat terasa seperti tidak menggunakan antivirus
Kemampuannya dalam scan yang baik, ditambah anti spam, anti spywarenya dan firewall.
Menggunakan resource memory yang sedikit
Menggunakan sedikit cpu usage
Kekurangan
Update virus definition harus connect dengan internet.
Tidak ada file virus definition yang bisa diinstall secara manual
Tampilan GUI sangat sederhana sekali, namun kecepatan loading GUInya cepat.
Jika ingin di Uninstal cukup sulit. kita harus masuk ke "Safemode" di PC atau komputer baru kita dapat meng-uninstal antivirus tersebut
Jadi buat teman-teman yang komputernya memiliki memory RAM nya kecil disarankan untuk menggunakan Antivirus ini.
Setelah membaca artikel Antivirus Terbaik Dunia. Sudahkah anda memutuskan mana antivirus yang cocok dengan laptop anda? Nah, selain antivirus berikut ini ada satu software yang pastinya bisa bermanfaat untuk anda. Yup, IDM namanya. Untuk mendapatkannya silahkan baca Download IDM, Gratis Aktif Selamanya!
8. F-Secure
F-Secure Anti-Virus adalah salah satu program antivirus terbaik perangkat lunak. Ini adalah efisien,cepat dan efektif. Dengan teknologi perlindungan canggih dan tambahan fitur keamananterintegrasi, F-Secure melindungi terhadap virus, spyware, worm dan Trojan. F-Secure juga dapat menemukan dan menghilangkan rootkit. Perangkat lunak antivirus juga melindungi terhadap virusmenyebar melalui email, cookie atau malware yang mencoba menyusup ke PC registri.
9. BullGuard
Kelebihan BullGuard Antivirus efektif dalam mendeteksi dan menghapus malware.Antivirus ini munking juga masih asing di telinga pengguna tanah air. namun bisa juga dijadikan pertimbangan. Bullguard mendapatkan score perlindungan 83%.
10. G Data
G DATA AntiVirus adalah solusi perlindungan yang lengkap untuk komputer rumah Anda. Ini akanmemindai PC Anda pada interval waktu yang teratur atau setiap kali Anda menetapkan ke. G DATA AntiVirus dapat mengidentifikasi dan menghapus malware yang paling dalam waktu singkatdi semua.